How to choose my components?
The components will be those having the most influence on game performance. That is to say, the processor (or CPU), the random access memory (or RAM), and the graphics card (or GPU). The motherboard may also be necessary, depending on the previous changes. If you would like to learn more about choosing your new components, we have produced an article on the verge pc build. In particular with the compatibility between the motherboard and the other components.
Otherwise, if you want to be sure that you are taking the right components together. They are upgrade kits, comprising CPU, motherboard, and RAM, directly compatible with each other. You will only have to mount on your machine. So, let’s know more about the verge pc build.
Preparation for The Verge PC Build
Are you afraid of this moment? Are you afraid of the complexity of this operation? Rest assured, this is much easier than it looks! And above all, we will give you all the tips and tricks for optimal assembly!
The rule of thumb before touching computer equipment is to be careful of static electricity! To do this, avoid wearing clothes that are too sensitive to the latter and discharge yourself from any that you may have by touching metal (for example, a radiator).
Once done, put on “OFF”the button of your power supply located behind your computer, then unplug all the cables and put your tower flat on the right side, if possible, on a sufficiently large workspace.
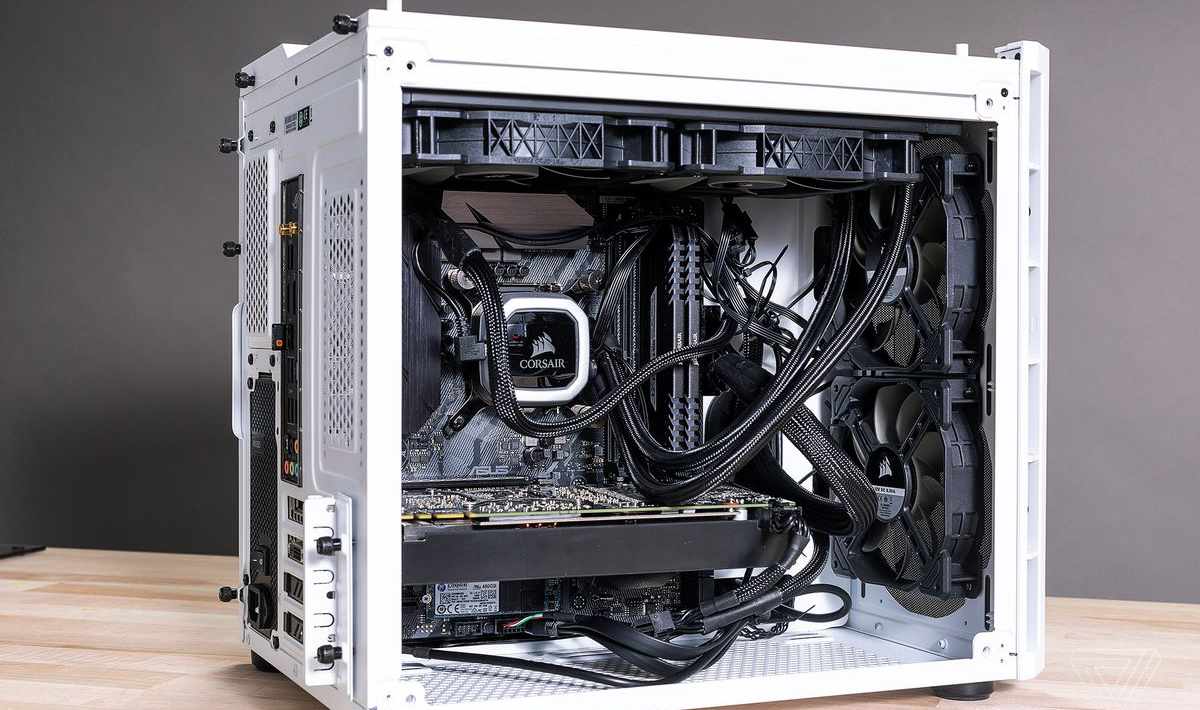
Open the side of your computer by removing the screws. These almost always hand screws for recent lathes. But it depends on the tightening or the model. It’s a good idea to have a medium-sized Phillips screwdriver (preferably magnetized).
Depending on the parts you want to add or replace, you may need specific tools:
Processor:
Ideally, isopropyl alcohol with a paper towel, tissue, or cloth. Those are used to clean the thermal grease on your processor. If you don’t have one, you can moisten it with water in due course. Also, in case you are using your old cooler, consider having a tube of thermal paste.
Motherboard: All of the above
For RAM sticks and everything in between, you don’t need a thing except attention.
Before you start installing your motherboard/component assembly in the case, you must first prepare the reception.
Open the case by removing the side panel and lay it down. It will be easier to work.
Once the case is open, remove the original cover for the motherboard connectors if it is present.
Check the presence of the fixing spacers at the location of the motherboard. If they are present, check that their position matches the holes on the motherboard. If a spacer comes in direct contact with the card’s back, it could damage or destroy it.
The motherboard always accompanies by a connector cover installed at the back of the case.
Insert the motherboard so that the external connectors fit correctly into the previously clipped cover.
Assembly of parts: Case by case
That is what you should see when looking at your motherboard from above, to make it easier for you to locate areas that are important to installing your new components.
Key ringed in red
Graphics card: Unplug the cables on the GPU, remove the screw that holds the graphics card with the PC case, press the push button, then remove the card! To install a new one, follow the same instructions, but in reverse order.
The graphics card is intended to render your game and video graphics in high definition. But if your computer use is limited to office automation, the motherboard can manage the display alone.
To install the graphics card:
Locate the PCI port closest to the processor where the graphics card will be installed.
Remove the necessary blanks from the back of the case depending on the size of the graphics card.
Insert the graphics card until you hear a clip indicating that the lock is engaged.
Screw everything on for optimal support.
Processor:
First, remove the cooler by unplugging the small cable that connects it to the motherboard (note the location to reconnect) and turning the retaining screws to pull up the latter to take them out of the motherboard and therefore remove the cooler.
Then, lift the small lever next to the processor to lift the metal structure with it, thus gently removing the processor from its location (the socket). Always be careful to take your CPU on the edges!
We recommend cleaning the old thermal paste with a little isopropyl alcohol on a tissue, paper towel, or cloth. If you don’t have one, depending on the thermal paste’s hardness, you can wipe without any product. If it is too dry, moisten your support very lightly with water and wipe gently. Repeat the same action for the surface of the cooler that was glued with the processor.
Once done, install the new CPU being careful to mark on the processor and the socket. It is a small triangle in the lower-left corner and places it gently on its intended area. Then replace the metal bracket, lowering the small lever and relocking it to where it was before. If everything is correct, you should apply a little force towards the end, but be careful. If you have to force too much, the processor is poorly positioned, so never use too much force!
Finally, put a small dab of thermal paste in the middle of your processor (be careful not to put too much of it. The risk of poor contact with the cooler), then flatten it by placing your cooler on the processor as before. Let it put back the fixings and finish by reconnecting the cable in the same place as earlier.
The final connections: The Verge PC Build
Once the components are plugged in, only the front panel peripherals remain to be connected.
Connect the various cables (start and reset buttons, operation LED, USB connectors) to the motherboard’s dedicated connectors. If in doubt, refer to your motherboard manual.
Connect the audio connectors (speaker/headset/microphone) to the JAUD1 connector on the motherboard.
The arrangement of the cables in the box
With a neat PC, well-ordered cables! It is recommended to organize the cables inside the box using cable ties.
Spacer example : The Verge PC Build
If you wish, you can already put CPU cooler and RAM sticks as explained before, but you can also do it directly inside the case, do careful never to apply stover.
Then put the new back panel from inside the box, put your motherboard, and be careful to put the panel’s socket ports. Finally, screw it to the case, as was the old card.
You have to put the graphics card and reconnect all the cables! If you do not know where to connect them, the manual with the motherboard can help you!
A more evolved graphics
It’s important to say that all professional gamers agree on one thing. The graphics offered by gaming PCs are of better quality than that of consoles. Therefore, one of the good reasons to invest in a gaming PC is that it is much more beautiful and more developed than a console, and the reason is quite simple. Indeed, unlike gaming consoles, gaming PCs have a separate component that takes care of the graphics: the graphics card. With today’s powerful models like the GTX and RTX, a PC offers extraordinary visual results.
Compatibility
With a PC, don’t panic. You will be able to play games dedicated to this platform without any problem and many other games with a different platform. So, whether it is PS4, PS3, PS2, PSP VITA, Xbox One, Xbox 360, Nintendo, and other games, you will be able without any fear to run these quickly and easily thanks to the configuration of your computer.
One of the right reasons to invest in a gaming PC will therefore be that it means that this machine is backward compatible and can, therefore, if you download the correct emulators, run all the games you want. It is also possible to play even old console games like the PS1 or Nintendo 64 on your computer without any problem. So in a sense, you have all the consoles together in one machine.
Subscription and game prices
It is well known that most consoles, games, and features require a subscription to function correctly. On the other hand, online gaming requires nothing more than an internet connection and your time on a gaming PC. This good reason to invest in a gaming PC does not offer any constraints, and above all, everything is free.
Similarly, it is much lower for PCs than for consoles when it comes to the price of games. These are sometimes half the cost, which is a real boost for computer owners.
Much more than a gaming machine
Indeed, whatever your machine’s power, you can always use it to do many other tasks. For example, you can still use it in the office, for drawing, or even for programming without worries. These are all excellent reasons to invest in a gaming PC.
Screw the block firmly to the wall
Prepare for wiring and take your time, so you don’t forget anything.
Start with the largest connector on the power supply, the 24-pin cable that connects to the motherboard.
Continue with connecting the processor power supply to the motherboard using the 8-pin cable.
Then, before connecting your graphics card, check the number of connectors required to work correctly, usually the 6 or 8 pin cable.
End up connecting your storage devices such as SSD and hard drive using SATA cables.
FAQ of The Verge PC Build
-
How to install Motherboard?
First, unplug all the cables that are on the motherboard, then remove the graphics card, the processor (with the cooler), and the RAM sticks as stated above. Once done, remove all the screws that hold the motherboard to the case. Usually, on the sides and in the center so that you can remove the card. Also, remove the rear panel by pressing from the outside of the case. You will notice that where there were the screws, there are spacers. Check if they face the holes on the new motherboard. If not, move them, or remove the extra ones.
-
Is it difficult to build a PC gaming?
Today, PC editing is really within everyone’s reach! The components have become more and more simplified to make it as easy and as pleasant as possible. But if you still have questions, the component manuals will be able to answer you, as well as the members of the Facebook group of the Gamer Squad!
-
How much does it cost to build a PC?
Although many thoughts suggest that a gaming PC is costly, it is essential to say that in reality, with less than $1200. You can have a real beast of competition. Many sites even offer to make your PC gamer assembly for less than $800.
So, it becomes much cheaper than most consoles of the same power level. Also, a gamer tower is a modular machine. It means that you can easily replace and customize the latter at a lower cost. So no need to change everything.
-
Why is PC gaming still a thing?
Although a gaming PC is quite a complicated tool for many people. It’s important to note that it offers a lot more. Indeed, according to many professional gamers, a gaming PC offers something more than other machines on the same side. For this reason, today we are giving you five good reasons why it is better to invest in a gaming PC than in another machine.
Conclusion of The Verge PC Build
If it is necessary to carry out maintenance on one of the components, you can have free rein. But above all, the airflow generated by the fan in the housing will be optimized.
Congratulations, you did it! Last straight line before the verdict! Connect your PC to the mains, connect your external devices such as screen, keyboard, mouse, and video cable (HDMI / VGA)
To your instructor, get set, Start! If you have followed this tutorial to the letter, your PC will start up without any problem. You will only have to install an operating system to be able to use it.