If you need to know how to wire an outlet, there’s a full article on that. Have you just bought a new home in which you lack outlets? You had your home built several years ago, but the number of outlets is not enough for you? Follow the 123elec tutorial to learn how to install an electrical outlet on an existing circuit by performing what calls transplanting.
From time to time, we need to connect a male socket with an electric wire. Whether it is to create an extension cord of the desired size or to repair a damaged plug. Follow in detail with us to know how to wire an outlet (you will see it is disconcertingly simple).
How to wire an outlet?
Step 1: let’s prepare the work.
My catch is ready!
You first need to cut your electric wire to the desired size. Then first, strip the protection so that you can work on each wire efficiently, then strip your wires with a wire stripper or with a cutter. Also, remember to unscrew the electrical plug. We will then move on to the connection.
Step 2: Plugin!
Everything is plugged in and holds properly.
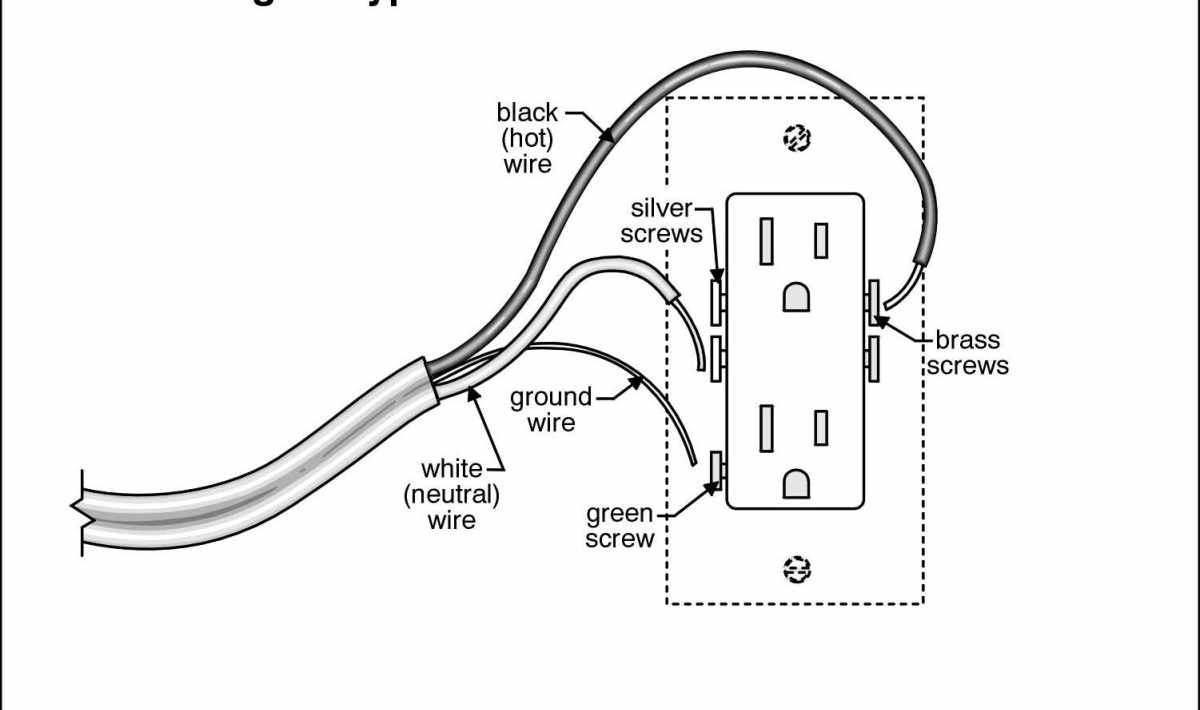
The connection for this type of plug could not be more straightforward: first, look for the earth, which is in the middle a little above the other two pins (symbolized in yellow/green in our photo).
Then insert the neutral and the phase (red and blue wires) in the two holes located on the left and the right. The order does not matter.
You need to tighten the wires: you need contact between the wire and the metal part surrounding it. Once all the cables are tight, check that they cannot come off quickly and not contact each other.
Step 3: Secure wire an outlet
Just close the protection, and it’s over!
Once all the wires connect to their respective locations. All you have to do is close the protective shell and make sure that it can no longer open. Who Said Electricity Was Difficult?
Also, I think that there are standards to be respected regarding the installation height of the socket. There is a complete article on how to wire an outlet..
How to connect a socket: which material to choose
To connect a socket. You could see it: we can choose either 1.5 mm² or 2.5 mm² for the red phase, the blue neutral, and the yellow-green earth, and we also have the choice between a circuit breaker 16 ampere or 20.
It all depends on how many electrical outlets you want to put on your circuit breaker and what you want to put on them.
If you need to install 12 electrical outlets, you will need to put on a 20-amp circuit breaker and use a 2.5 mm² section of electrical cable.
If you need eight sockets, you will need a 16 amp circuit breaker with a 1.5 mm² cable section.
There is, however, an exception in the kitchen. It is eight electrical outlets with earth (yellow-green) for a 20 amp circuit breaker, special circuit breaker like that of the electric oven of the washing machine, dishwasher, freezer.
To learn more about specialized circuits, see the article on the number of outlets per circuit breaker, or I will explain everything to you.
Safety for the electrical installation of the socket
As we said at the very beginning: plugging in an electronic outlet involves dangers that can kill you. We will have to work without voltage. That is to say, without current to be able to mount our outlet.
- You will therefore have to find your branch circuit breaker and turn it off.
- Only be able to turn on the power when you have finished your work and connected everything correctly.
- Let’s see now where this electrical equipment is (the general circuit breaker). To help you, it is the only one where it writes above 500 mA.
- turn off the branch circuit breaker to install an electrical outlet
- To turn off the connection circuit breaker, but the switch down.
- Then make sure that you have no current anywhere in your habitat.
To do this, you can test your sockets and your lights so that nothing lights up, but the best and safest is to use a voltage absence checker or a multimeter and measure the voltage between the red colored phase. And the blue neutral of your RCDs, those with 30 mA written on them.
Now that we are off, we will move on.
Installation of the circuit breaker for the outlet in the distribution panel
Now that you have chosen the 16-amp or 20-amp circuit breaker, depending on the number of electrical outlets you want to have and cutting the power, you will have to connect it behind a differential to ensure your safety with the grounding. Earth.
You have to go to the distribution panel, which is the panel with all the circuit breakers in your home.
The differential circuit breakers are more significant than the others, and they write on 30 mA. They are at the head of all the electrical feeders in your home.
They are used to measure the current entering and to leave. If it seems that there is a voltage difference, it cuts the present, so it is essential for the installation of the circuit breaker of the socket because it will detect that your devices are not grounded. There is a full article regarding the differential on the site.
Here is an image of an electrical circuit that will be more telling:
- Differential protection
- As you can see, the 16 or 20 amp magneto thermal breaker wire after a GFCI breaker.
- You can put a maximum of 8 circuit breakers after an RCD.
There may be terminal strips or bridges with electrical cables from the differential circuit breaker to the circuit breaker for the electrical outlets. It is up to you to see how to connect your new circuit breaker depending on what you have already in your allocation table.
The differential can also have the electrical input and output at the top. And not the current information at the top and the bottom’s production as in the image above.
Here is an image of another differential circuit breaker model from above:
- Electrical outlet connection diagram
- Now that we have understood the basics, we will see your electrical outlet’s electrical connection diagram.
- In this diagram, we will see how to plug in a single outlet, and in a second step, we will see how to put several electrical outlets.
How to connect an electrical wire an outlet?
As you can see, there is the earth symbol, which will have to end up on your electrical outlet. It is here that you will have to connect the yellow-green cable.
That does not matter where to put the phase and the neutral. It is still preferable to set the neutral on the left and the stage on the right as on the circuit breakers.
Ps: make a good tightening at the level of the connection terminals with your screwdriver. It is essential to strip your electric wires cleanly and never forget the earth connection (the earth wire is yellow-green).
Now let’s see how to connect several sockets. You have several methods for this.
How to wire an outlet in parallel?
We will now see how to connect and connect several sockets by putting them in parallel. This method is useful when we don’t want to use a junction box.
Parallel socket connection:
- If you do not have the quick fixing on your sockets but tightening screws, you will have to put two cables in this place and make it drawing.
- You cannot put more than two cables in the same location.
- Sockets with junction box
- We will now see how to make several outlets using a junction box.
- For my example, I am using wages, but you can do it with electric dominoes.
- connect several electrical outlets with junction box
- Take the time to look at the image to understand. You have the power cable of the phase, neutral, and earth, which supplies a wago (or domino).
- From this wago several red blue or green-yellow cables leave supply the various electrical outlet.
A reminder of the requirements of standard NF C 15-100
The standard which governs the regulations for residential electrical installations, namely NF C 15-100, specifies that a single socket circuit cannot have more than:
- Eight sockets when made from 1.5² and protected by a 16A circuit breaker;
- 12 sockets for a course of electrical outlets with 2.5² conductors and 20A protection;
- Six sockets on a kitchen circuit, made of 2.5² and protected by a 20A circuit breaker without a specialized socket.
- The NF C 15-100 standard and electrical outlets
What does transplanting consist of?
All the electrical outlets of the same circuit connect in parallel. Thus, they relate to the same phase (red or brown wire) and the same neutral (blue wire).
Therefore, adding a socket to an existing circuit involves connecting new equipment on the same cable as the sockets already installed. That is transplanting. To perform this installation, make sure that the cable is long enough and easily accessible (e.g., inside the lining of a plasterboard partition).
- Add an electrical outlet to an existing circuit.
- Start by switching off the current and check the absence of voltage with a VAT.
- Mark the location of the news outlet.
- Drill using a hole saw with a diameter of 67mm.
- Pull the circuit wire and cut it, making sure you have two equal parts.
- Strip each part of the cable about 7 cm using, for example, a stripping knife and stripping.
- Insert the wires into the membranes of a flush-mounting box of a suitable diameter and depth, preferably airtight to avoid thermal bridges.
- Install the flush-mounting box, then screw it to the partition.
- Strip the electrical wires with a wire stripper.
- Clip the socket mechanism onto its mounting bracket (if the equipment is delivered wholly broken down).
Connect the two parts of the cable to the electrical outlet:
- The red or brown wires to the L terminal (phase)
- The blue cables to the N terminal (neutral)
- The green/yellow wires to the earth (middle terminal)
- Secure the equipment to the flush-mounting box and use a spirit level to ensure its horizontality.
- Finally, clip the cover plate onto the mounting bracket.
- You can then turn the power back on and test the electrical outlet.
The steps listed below allow you to add a socket on an existing circuit between two devices already installed. If you wish to add a socket at the end of the course, carry out the same operations by joining the last two sockets with suitable cross-section conductors.
FAQ of How to wire an outlet
-
How to pull an electrical outlet?
Drill using a hole saw with a diameter of 67mm. Pull the circuit cable and cut it, making sure you have two equal parts. Strip each part of the cable about 7 cm using, for example, a stripping knife and stripping.
-
Where is the neutral on an outlet?
By convention, the neutral is on the left on a front view, and the phase is on the right. To make sure that an outlet is connected correctly, you can check it without taking anything apart.
-
How to know where is the phase and the neutral?
The phase wire is the most dangerous of electrical cables.
The electric wires have a color code: red for the phase, blue for the neutral, yellow and green for the earth wires.
-
What section of wire for 2000w?
From what you indicate, you do not exceed 2000 watts per circuit, so 1.5 is fine. Hello, If I understand correctly, all radiators with a power equal to or less than 2000W can be connected to the wall socket in 1.5.
Conclusion on how to wire an outlet
Now you know how to wire an outlet works and how to connect several. If you have questions or need additional information, you can write to me on the page provided for this purpose. It will not just plug in a power strip on your socket.
You will only put the power back on once you have finished connecting your socket and all devices. Such as the electrical panel, for example, have been closed.