Every artist needs space to be creative. Hobbyists start out cramming supplies into a corner of a spare room, and making the best of a lousy job, using an area never designed for the purpose. Anyone who wants to enjoy being an artist needs to feel they have space and light to inspire creativity. The traditional view of some bohemian working away stuck in an attic does have a bit of glamour about it. Unfortunately not many of us have lofts these days, but a lot more of us have garages. Even though the garage is meant for the car, most times it’s full of junk, and the vehicle sits permanently on the drive. My wife and friends love to spend their spare time refurbishing old pieces of furniture by painting them. The garage is ideal for working on furniture of all shapes and sizes.
A one-car detached garage is an ideal size for a creative space such as an art studio. The biggest drawback is often the lack of natural light. This is often the case if the garage is attached to the house. If you are thinking of converting your garage into say a studio for painting getting natural light into the space should be the first consideration. You need to install glass doors for the garage. If the garage has a separate entryway, then replace that with a full glass door. If possible, it would be great to install windows or skylights to help flood the space with natural light. Doing these structural alterations can be costly, and time-consuming, and in most cases are best left to specialists. Let’s look at the steps needed to turn your garage into the art studio of your dreams.
Clear Out
If you’re like me, the car isn’t in the garage. Instead, it’s filled with years and years of accumulated junk. There are all sorts of things that have been put away for a ‘rainy day’, and to be honest will never be used again. So, this is an excellent time to de-clutter. Take some time to decide what you want to keep, and what can go to a yard sale, or needs to be taken to the tip. Remember, the more you get rid of, the more space you’ll have for your studio. Once you have removed all the things in the garage and have a clear space clean it thoroughly. With the garage empty this allows you to check the condition of the walls, the floor and ceiling to see if any remedial work needs doing. It also gives you a chance to check the location of power sockets, as they may need to be moved to more accessible places if the art studio is going to work. If the garage doesn’t already have plumbing take the time to design a layout that will incorporate a small sink at least.
Structural Changes
Once the garage is cleared out, you can start on any structural changes that need to be done. Remodelling may require extra doorways, and windows, consider how you are going to use the space, and where you are going to do most of your artistic work. Most artists want diffuse sunlight rather than being in the glare of the sun. Also this can make your working conditions more bearable in the warmer summer months. If your original garage door doesn’t have any windows, consider changing it for one that has more glasswork, or replacing it with side hung garage doors, or sliding glass panels. A glass side to the studio will ensure there is plenty of light, and you have a view when being creative. Also it can make access to the space much more straightforward. Sliding glass doors can also help with cooling cross ventilation in the summer, thus reducing the need for air conditioning.
Services
Your garage will most likely have electricity already, but you may have to move mains sockets to a new location to fit in with the layout you’ve decided for your studio. At the same time, think if you need to run cabling for new light fittings in the ceiling or walls. The chances are the overhead light you already have in the garage will not be enough for the space’s new purpose. If you’re going to use your art studio for painting, or pottery, or any other pastime that’ll get your hand dirty then a washbasin, or preferably a sink will be a godsend. Often it’s not that difficult to plumb a sink into a garage if there aren’t already hot, cold and wastewater pipes in there. If you intend to use your studio all the year-round it’s advisable to put in some form of heating, or cooling to the garage if there is not one already installed. Some modern garages come with underfloor heating, but most have none at all. Electric heaters are a cheap and straightforward option; otherwise you could go for a wood-burner stove to add some rustic charm to your studio. An air conditioning unit will provide heating during the winter, and cooling during the summer.
Walls and Floors
With the services sorted we can turn our attention to the walls and floor. Most garage floors are typically made of concrete. Often they are just left exposed, which means they can be rough and uneven. A cheap and simple method to seal the floor, so it looks good and is level is to use an epoxy resin coating. The epoxy can be coloured to give a uniform finish, or you can embed wallpaper to provide the impression the floor’s made of wood, stone, or anything you like. In most instances an epoxy resin floor can be laid in a day, and be ready to walk on within 48 hours. The constant problem with a concrete floor is it being cold especially during the winter. You can use throw rugs to add a little extra insulation and to make your studio more homely. When it comes to the walls, as we’ve said earlier, light is crucial in an art studio, so painting them white is your best option. The white paint will reflect any light you do have from any source and brightens even the dingiest garage.
Let There Be Light
If your garage doesn’t have enough natural light you’re going to have to install additional lighting. Nowadays the extra light you need is a lot easier thanks to LED light panels. The panels come in lots of different sizes and can be mounted on the walls or ceilings to give a diffuse light. Installing it on the wall creates the effect of having a window, and on the ceiling it can be like a skylight. The great thing about these LED panels is that the colour temperature of the light can be altered, along with its brightness. The variations are limitless, and with remote controls linking them all together, you can create the best lighting conditions for your artistic work. You may need more light for close work, and that can be done with an individual desk or floor standing lamp.
Putting Things Away
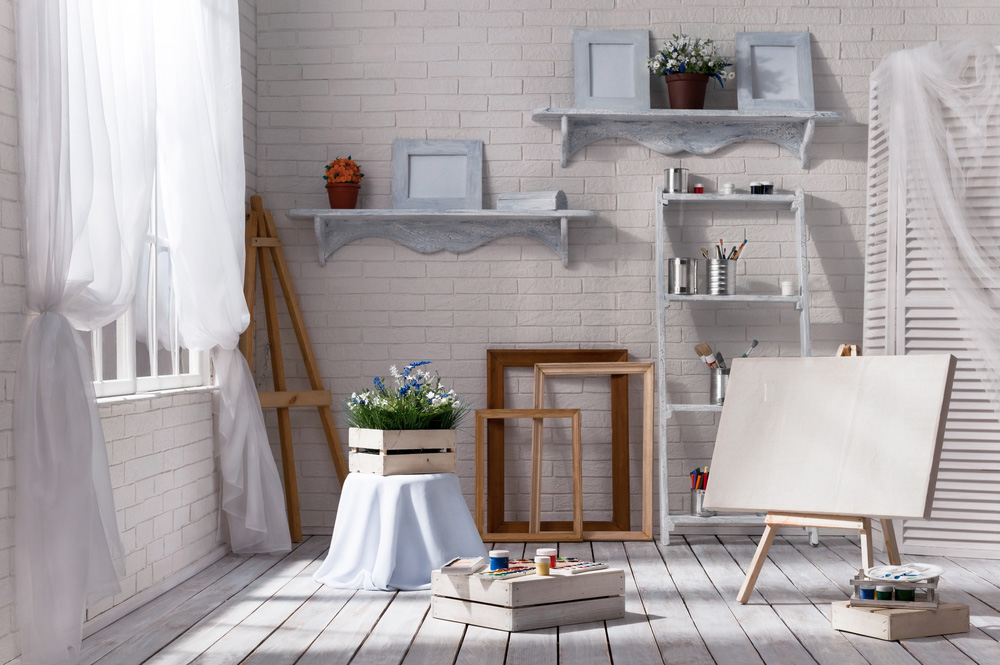
Whatever artistic work you’re going to carry out in your garage studio, you’re going to need plenty of storage for your supplies. There are lots of simple storage solutions at your local home improvement store. It’s very much to your taste, budget, and the kind of art you’re going to do in the space. Shelving is a must, it’s a convenient place to put baskets containing supplies, and it makes the area look neater too. For a painter an old dresser can be a great solution to storing brushes and paints, and the top can be used to show off artwork.
Where to Work
The furniture you need for your artwork will be the last element to bring your studio to life. It may be a workbench or a big table. You may need nothing more than an easel and chair. Try and set the studio space into distinct zones, for working and cleaning up, for storage, and for relaxing. Try not to clutter your studio with furniture, as it will only get in the way, and make the place look messy.
With all that work done, you’re ready to start being creative in your new art studio space.