If you are looking for some effective tips for how to make crackle paint, then this article is for you. As we know, the old furniture chases expend years chasing painted chunks that have almost the treaty patina, its cracked coatings of color even exuding with delight. If you want, you can lessen the time of this journey with differing tones of steady latex color and a particular tool that arrives out of the can as a blurry fluid.
Now gets on obvious, and shrinks and crashes the dye shade coated on the lid of it, and disclosing glances of the ground shade. Crackle mediocre old furniture straight before your gazes. That indicates you can build your edition of a chunk’s record with tones of your preference, whether you’re aging one that’s undoubtedly ancient or not. So it is essential to know how to make crackle paint.
A layer of latex color will add pigment to direct timber furniture, not ample else. Certainly, crush the boredom, evaluate treating slabs, stools, portrait coverings, or several decorating elements to a crackle polish. And a spotted blanket that emits a vintage vibe. Generated by utilizing two unique tones of color, it’s a simple and graceful impact to accomplish with the proper equipment and methods.
However, the procedure of crackle paint can be significantly fast; its ingenious outcomes will evacuate people believing that the old patina took decennary to improve. Today I will discuss how to make crackle paint. Just follow the steps below.
How to make crackle paint
To make crackle paint on your vintage furniture, you need some specific equipment. That can help you to do your project correctly.
Types of equipment and tools
- 80 to 150 grit Sandpaper
- Damp hankie
- Acrylic or latex paint
- Paintbrushes
- Spencer brush
- Primer
- Paint roller
- Painter’s tape
- Sponge
- Crackle medium or school glue
- Sealant
Step 1: Pick an adorning element or slab of furniture to crackle paint.
Crackle painting endeavors on several unique grounds and components, particularly as ceramic and canvas. Though, it generally gazes ample realistic on stiff chunks that repel typically over the period. Contemplate crackle painting an old rocking chair, a garnishing package, or a piece of wall painting.
The with-it injunction to reduce anomalies and prep the ground for stain, it’s essential to gravel timber that you plan to crackle. To begin with, unfinished furniture, take a precise sanding with 150-grit or fine sandpaper. It seizes to soften it. If there’s already tint or paint on the chunk and extract the tone and radiance with an orbital sander. Brush off the sanding dust with a damp cloth.
STEP 2: Sand unbending elements with 80 to 150-grit sandpaper.
If you want to stain a wooden item, buy sandpaper that is 150-grit or better than this from home improvement stock. Wipe the sandpaper against the portion of the ground to assemble it softer for art. Assign a delicate, straight covering of primer to the dusty chunk. Now use a paintbrush for tinier chips and sprinkle primer for bigger ground spaces.
Allow it wipe according to the factory’s instructions. And you’ll need to prepare clear your item is neat and clean from any kind of grime. This is particularly significant for stiff chunks as you’ll further requirement to get relieved of any lasting rubbing dust. Drive gentle liquid over a neat hankie for limited minutes and wringing out the water. Clean the whole ground of your material.
STEP 3: Apply primer to the element and a latex or acrylic base layer and allow it to dry overnight.
Stay until the element is dusty to the glimmer and then disperse some stain primer and a paintbrush. Wipe one layer of primer onto the elements’ ground and permit it to be dusty ultimately. This should carry around between one or two hours.
Each particular color primer should fit nicely. But consider obtaining a timber primer if your purpose is wooden so that any cracks in the wood are appropriately stood in.
It is better to apply latex paint of any level of veneer for the basis covering color, but a semi-gloss or acrylic is suitable. So that the cracks of stain shimmer in the glimmer. Confirm the direction of the particle, scrub paint over the grounds and connections of the chunk, and then permit the ground coat to dry for a day.
Step-4: Make a crackle forum
The crackle forum can grab one of two shapes, each with various requisition method. For a perfect glaze, select marketable crackle medium retailed at craft shops. You can tape off any ground regions you don’t want to crackle paint.
Then, pertain a raw coating of the milk-white material over the painted chunk, trying a sponge to establish tiny cracks or a neat paintbrush or roller for more significant damages. The crackle medium tosses on marked, so stint from the top-down or bottom-up. So that you will know which emerges you have finally coat. Allow drying for at least one or two hours. Not more than enough.
For a limited costly but equally beneficial the old finish. Now enroll the assistance of a school glue while practicing how to make crackle paint. Maintaining the chunk phase with the ground, brush a pale coating of glue over it to generate hairline cracks or a heavier layer for bigger gaps. Continue to Step 5 when the bond is still cheap. If you’re doing for a minor venture, you can glaze the whole chunk in glue before assigning the overcoat. As the larger pieces will expect you pertain glue to one ground at a time, so the glue doesn’t find solution before it is crackled.
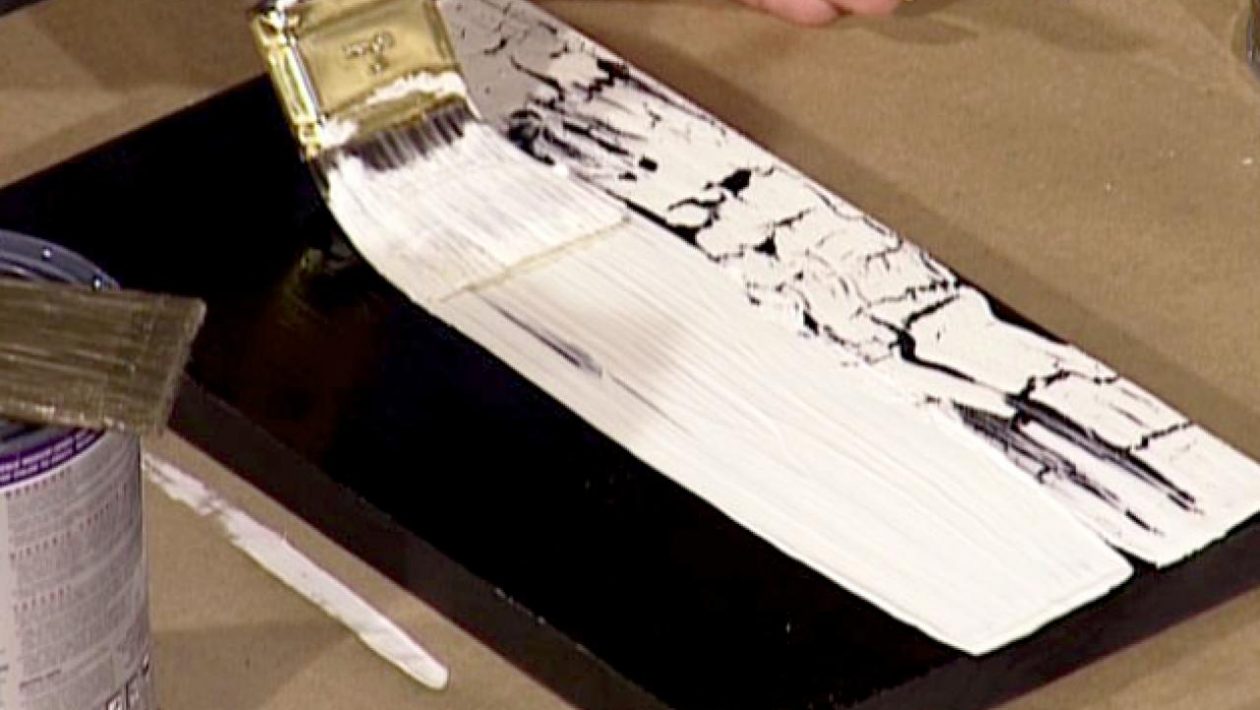
Step-5: Apply crackle paint on your furniture
Utilizing a tidy paintbrush, pertain to an ultimate layer of steady latex paint in several paints on the dried crackle medium. However, the clingy glue until the chunk is entirely garnished. Select a color of paint that differences with the base skin color. The overcoat will reduce, crack, and reveal crumbs of the core layer nearly rapidly after the paint is uncovered to the crackle forum. Prevent retouching colored areas so as not to remove the cracks. Allow the crackle glaze air-dry for 24 hours.
If you’re utilizing school glue, fix the topcoat and bond with a hairdryer on the heated location. Clutch the dryer two to three inches from the ground and outbreak in one room until the extent of cracklins coats your technique. Then action on to another area. Proceed until the whole chunk is crackled, and the glue is entirely remedied.
Step-6: Get a perfect finish
Involve a bright covering to furniture chunks that will get a lot of use to ensure the texture and prepare it ultimately, or let the crackle glaze run without adhesive to accentuate its despicable beauty.
Later practicing on a solitary scenery inflection, you might discover you’re prepared to settle those newly found abilities to utilize, providing a new-old texture to additional overlooked furniture throughout the home. So now you wonder how to make crackle paint.
Another way to get a perfect crackle paint
Select and keep safe your workspace.
Discover an area to paint where there’s decent ventilation, particularly in the veneer or in an empty room. Since collecting the paint away, consume pages of the magazine all over your painting ground to protect it and anything else in the room from evolving decayed.
Subsequently, pursuing the primers drying ways, select acrylic or latex paint to apply as a ground layer. This can occur in any color you like. But it’s good to obtain a color that’s semi-gloss or satin. Wipe on the stain in the way of the particle until the whole item is colored. Establish the element aside to rub until overnight.
This will be varied than the color you utilize for your overcoat. Your overcoat should have a horizontal or matte glaze. That seems additional inundated than semi-gloss or satin. Also, the top and base layers should be varying colors, too as aquamarine.
Rub crackle medium or school glue onto the object’s ground.
Try to go to an art store and either buy a traditional crackle medium or white school glue. Utilize a paintbrush to decorate the element you’re creating in either the crackle medium or the adhesive. Crackle medium is more costly than school glue, but both choices generally furnish decent results.
Apply heavy layers to get vast cracks and pale layers to get minor ones.
If you prefer to establish vast cracks, settle large blocks of glue or crackle medium onto your paintbrush and apply it to your item’s ground. Scoop your paintbrush into the glue or crackle medium rapidly before pertaining it to your item’s land if you want hairline cracks.
Allow crackle medium fully dry.
If you’re borrowing a crackle medium, allow it one or three hours to dry. Otherwise, stride onto coloring your topcoat instantly. For the crackling to function accurately, the glue must be adherent when the coat pertains.
Select a steady latex or acrylic color for the topcoat
Grab a color that varies nicely with your footing coat color to obtain the favorable optical impacts. Like if your core coat is glossy light, you might assume selecting royal blue as a topcoat. Suppose the color to dry totally so that the cracks remain untouched.
Apply a top coat of steady latex or acrylic paint.
Rub one layer only of steady latex or acrylic paint over the crackle forum or glue. Wipe your topcoat on lightly to obtain thin cracks and tussle on a thick coat to get vast damages. Borrow a pouncer brush to sponge-paint the top coat when you are expecting spiderweb-like cracks.
Leave the paint at least 2 or 3 hours to dry.
If you aren’t clear if it’s dusty, lightly touch an indistinct portion of the point with your fingertip. If it touches dusty, and not clingy, hence the paint is dry.
Gravel the horizons of wooden elements to create the base coat more noticeable.
Subsequently, the topcoat is entirely dusty to the touch, gravel the element similarly with sandpaper. If you expect to detect a bunch more of the core layer, then sand the whole element. If you barely expect to expand a little bit additional to the despicable glance, simply sand the elements’ horizons and arches.
Establish midst and fabric with aging dust.
If your element is yet glancing similarly modern, then you can borrow a paintbrush to brush on some aging dust to give it the vision of the era—emphasis on pertaining the dust in cracks and ravines in the injunction to detect better thick and composition. You can also buy dust at craft supplies and online.
Plug the texture with an apparent coat of sealant.
Formerly you’ve bought your stuff the way you need it, just latch in its glaze by rubbing on an apparent layer of sealant. This exists a particularly nice idea if your element is a repeatedly utilized chunk of furniture that you need to protect.
Pursue the sealant drying teachings before using the element.
If your element is something that will be caressed slightly frequently, such as a chunk of wall painting, then don’t go with the sealant. This will accentuate the despicable glance. That’s another way how to make crackle paint.
FAQ
- How many years does chalk paint last?
And: Chalk paint lasts at least one year. Usually, Chalk Paint and Wall Paint can potentially last for several years. It is better to use chalk paint one year after purchase.
- Why does crackle paint not working?
You must try smooth paint for the topcoat. And the crackle will not act at all. Try to keep your topcoat flat. If you don’t get anything else exact, try this. You have to go over the crackle medium, so make sure that there is sufficient color on your brush. That can cover the crackled area.
- How to seal crackle paint?
When the whole crackle finish is dusty, seal the chunk with a layer of acrylic polyurethane. You can also use white glue as a crackle finish medium. Dust the glue on a base-coated chunk, and while the glue is dry enough to set a pale covering, brush on the top-coat color.
- Why does paint crackle?
Paint can emerge for a variety of reasons:
When a top coat of paint pertains over an undercover, that is not dry, when a strict material has pertained over something also adjustable.